FrontAid CMS - Agile Content Management with JSON & Git.
» FrontAid CMS / Blog
How to set up JSON Schema with WebStorm or IntelliJ IDEA
JSON Schema is a great way to simplify writing and validating JSON files. The IDEs/editors from Jetbrains, like IntelliJ IDEA or WebStorm, have built-in support for JSON Schema definitions. It only requires a quick one-time setup.
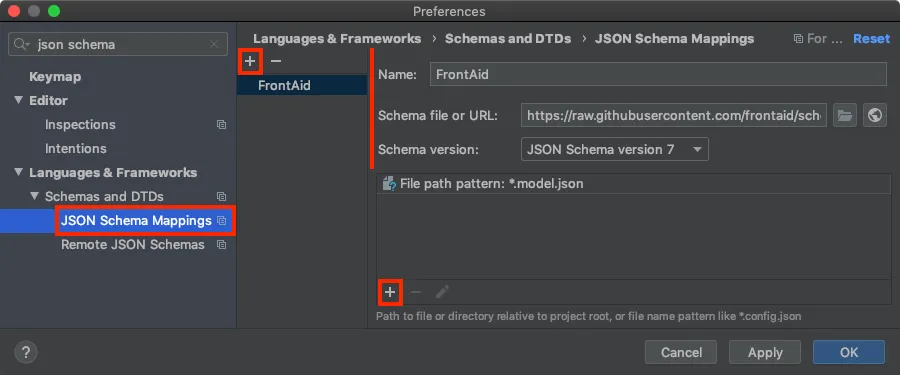
Open the IDE settings and search for “JSON Schema”. Then select “Languages & Frameworks” » “Schemas and DTDs” » “JSON Schema Mappings”. Click the ”+” button at the top to add a new JSON schema configuration. Then fill in the corresponding name, file or URL, and version. For the FrontAid CMS schema, use the following:
- Name: FrontAid
- Schema file or URL: https://raw.githubusercontent.com/frontaid/schema/master/frontaid-schema.json
- Schema version: JSON Schema version 7
Then click the ”+” button at the bottom and define which file(s) should be validated using the JSON schema. You can select certain files directly or by using a file name pattern. Additionally, you can also define a whole directory. For the FrontAid schema, it might make sense to select the model file directly or use a pattern like *.model.json. With the latter, all files whose names end with “.model.json” will be validated with the schema.

Click OK and verify that the configuration works. With JSON schema configured properly, the IDE will now automatically validate JSON files that you configured accordingly. And you will also get code completion while writing JSON content like you are already used to while programming.
You can also find more information about the FrontAid Schema on its GitHub repository or in the Schema Documentation.