Project Data Models
A Data Model defines the content and structure that your application expects. You can define the names of text fields, create (nested) objects, and define lists of other objects. A Model is written in the JSON format and must comply with the Schema.
Note that we strongly encourage you to set up the Schema in your code editor. That will provide you with code-completion and will warn you about potential errors in the Model. In other words; it will massively decrease the time needed to create and update Data Models for FrontAid CMS.
Basics
A FrontAid CMS Model is always an object {} with certain properties.
The :name property on the root is mandatory and you should use it to name the corresponding project.
You can also add an optional :description property to add more context.
{
  ":name": "Mandatory Name",
  ":description": "Optional Description"
}
From there, you can add your own properties to model your data.
Note that properties that are predefined by FrontAid CMS are always prefixed with a colon :.
And every other property is a custom user property.
So in order to model your content, you can define your own Fields, Objects, and Arrays/Lists (see below for more information on each of those).
We will call them “nodes” in the remainder of this document.
Every node can optionally have the :name and/or :description property to make it clearer what is expected from the editor.
If no :name property is defined, FrontAid will just use the property name itself as a fallback.
Fields
Every node that has a :type property is a field which is used for input fields.
In the example below, the editor can fill in a text input field which is called “exampleField”.
{
  ":name": "Example",
  "exampleField": {":type": "line"}
}
FrontAid CMS currently supports the following field types:
line- Simple one-line input field.text- Multi-line textarea.image- Allow content editors to upload new or select existing images.
Rich Text Fields
Both line and text fields are plain text by default.
They do not allow or support any kind of formatting, everything is just text.
But that is not enough for most applications that rely on a CMS.
Hence, FrontAid CMS also supports rich text fields.
They allow a diverse set of formatting and editing that is not possible with plain text only.
For example, you can add headings, lists, or format some texts as bold.
To use rich text fields, annotate a line or text field with ":richtext": true.
{
  ":name": "Demo with rich text fields",
  "lineWithFormatting": {":type": "line", ":richtext": true},
  "textWithFormatting": {":type": "text", ":richtext": true},
}
The content and formatting of rich text fields is stored as HTML.
A rich text
linefield only allows inline styling such as bold or italic, but not paragraphs, headings or even line breaks. As an example, it can be used for headings that allow inline styling but do not allow to change the heading itself.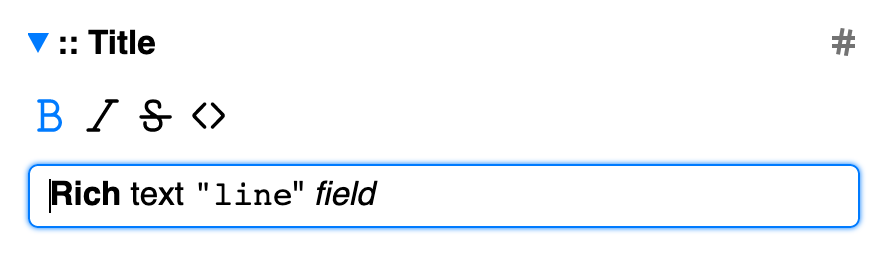
A rich text
textfield supports all formatting options, both block level (e.g. headings, paragraphs, lists) and inline styling. As an example, this could be used for blog posts that require rich formatting options.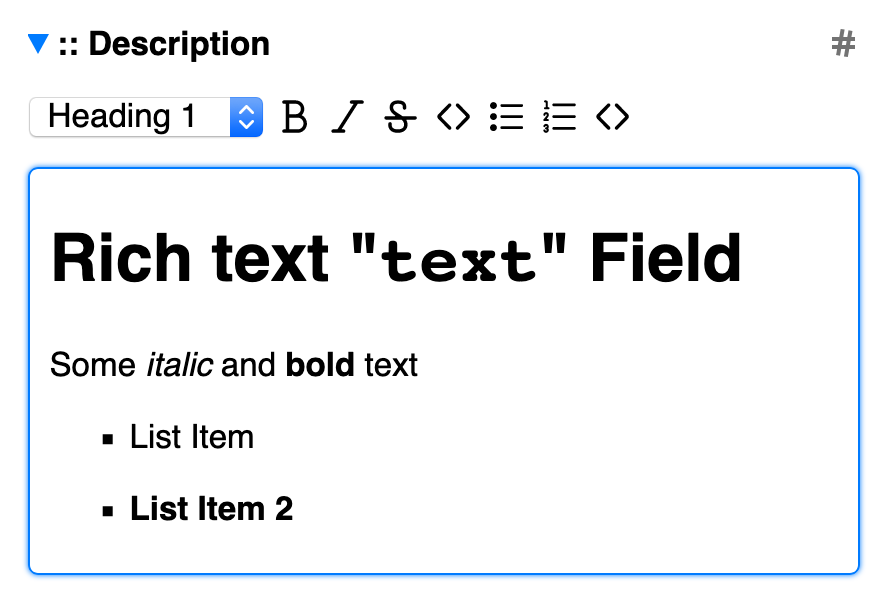
Image Fields
FrontAid provides a service integration so that content editors can upload image files. These images will be stored and served using a CDN (Content Delivery Network). You as a developer can use these images and resize or convert them as needed using image processing functionality.
Set a field type to image as follows to get started.
{
  ":name": "Demo with image",
  "imageFieldExample": {":type": "image"},
}
Given the FrontAid Model from above, content editors will be able to upload new or select existing images. When they save their changes, the updated Content file will give you all the information that you need to display the selected image in your website or application. The JSON Content stored for images will look similar to the example below.
{
  "imageFieldExample": {
    "provider": "uploadcare",
    "type": "image",
    "id": "4043df80-faca-44aa-aeec-b4e0503fbc65",
    "height": 1000,
    "width": 1000
  }
}
The provider and type properties will be set to uploadcare and image, respectively.
The id property will contain the unique ID of the selected image.
And width and height contain the image’s dimensions.
Given all that information, it is very simple to display that specific image.
Just prefix the id value with https://ucarecdn.com/ and you get the image’s URL.
Optionally, you can do some image processing by appending further parameters to the URL.
A complete example of an image URL could look like this.
https://ucarecdn.com/4043df80-faca-44aa-aeec-b4e0503fbc65/-/preview/800x400/
Objects
An object node is a collection of key/value pairs. An object’s value is again a node that can be either a field, a list, or another object. And thus it allows to model nested data structures.
In the following example, there is an object called “exampleObject” that contains two different field nodes. When such a Model is used with FrontAid CMS, the editor will be able to expand or zoom in on the object to view and focus on its child nodes.
{
  ":name": "Example",
  "exampleObject": {
    "exampleField1": {":type": "line"},
    "exampleField2": {":type": "text"}
  }
}
Lists / Arrays
FrontAid CMS also offers easy handling of lists/arrays.
Every node that has an :items property is used as a list of things.
In the example below, “exampleList” is a list of zero to unlimited nodes and each node is an object containing the “exampleField1” and “exampleField2” fields.
{
  ":name": "Example",
  "exampleList": {
    ":items": {
      "exampleField1": {":type": "line"},
      "exampleField2": {":type": "text"}
    }
  }
}
Example
Now let’s use all node types in an example and have a look at the resulting JSON file which is generated after an editor has done their work.
We create a Model for a simple website.
It has a global name, an index page, and a blog.
The blog contains a list of blog posts.
To model that website with a FrontAid CMS Model, you can use something like the following example.
It specifies the mandatory :name property as well as three nodes name, index, and blog.
nameis a field with a single-line text inputindexis an object with the two propertiestitleandtext(both of which are input fields)blogis a list of object nodes, each of which also has the two fieldstitleandtext
{
  ":name": "Example Website",
  "name": {
    ":description": "Website name",
    ":type": "line"
  },
  "index": {
    ":description": "Content for the index page",
    "title": {":type": "line"},
    "text":  {":type": "text"}
  },
  "blog": {
    ":description": "List of blog posts",
    ":items": {
      "title": {":type": "line"},
      "text":  {":type": "text"}
    }
  }
}
When you push that Model to your Git provider and connect that with FrontAid CMS, an editor will be able to fill in the blanks. They will be presented with an easy-to-use form which represents the exact Model that you defined. They can navigate the Model and fill in the website name, the index content, and create/update blog posts.
When the editor saves their changes, an example JSON output could look like the following.
The structure matches your Model, only the content is added to it in addition.
Fields have a value, objects keep their property nodes, and lists (as defined with the :items property) will be transformed to a list of objects.
{
"name": "FrontAid CMS",
"index": {
"title": "Agile Content Management with Git.",
"text": "FrontAid CMS is a decoupled and Git-based content management system."
},
"blog": [
{
"title": "Blog Post #1",
"text": "Lorem ipsum..."
},
{
"title": "Blog Post #2",
"text": "Dolor sit amet..."
},
{
"title": "Blog Post #3",
"text": "Consectetur adipisici elit..."
}
]
}